Shortly after I got married my wife made a joke one evening that we should get chickens. That weekend we had an old aviary filled with four chickens. We've now had them for almost 7 years (on our 4th group now) and we've rarely been without chickens.
Collecting your own eggs is extremely satisfying and the golden yoke that oozes out of a freshly poached egg can not be beaten, Together with some freshly cut spinach from the veggie patch sauteed with some of our own garlic over a piece of toast is now a regular weekend breakfast. Not your average breakfast!
So I would like to share some of my learning's about keeping chickens and managing them in an efficient way so that they are relatively low maintenance.
It all starts with the coop which if set up right will make life much easier for you and make for happy chickens. This blog entry focuses on the coop itself which provides shelter and safety for them. I will do another entry that will focus on managing the chickens and a final entry might happen in a few months when we need to change them for some new ones. The reality here is that the chickens need to be killed and cleaned and I will go through that with you as well.
But for now my current lot of chickens are still laying productively so they will be spared for a bit longer.
I designed and built this chicken coop myself and while there are plenty of designs out there - some very impressive chicken palaces as well - this blog entry will focus on the logic behind some of the design features.
When designing the coop I wanted to make sure everything was a standard size. So the base of the shed was 2.4m by 1.2m. Each of my gardens beds were designed to be 1.2m wide so my logic was I could place the chicken shed over the garden beds at different times of the year and have the chickens fertilise them for me. It turned out that this was much too heavy to move around so it has stayed put. But at least I minimised the cutting I needed to do.
It was all carefully planned out so I started with cutting everything to the length I needed.
Here is everything laid out.
I just used treated pine for the structure, marine ply for the housing and some fencing sheets for the roof. Tried to do this as cheaply as possible - unfortunately not as cheap as I would have liked.
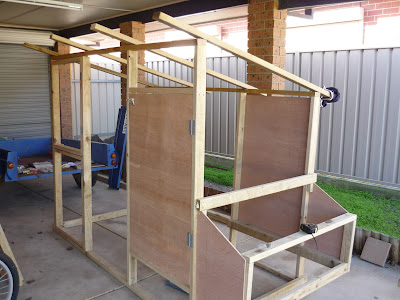
First job was to assemble the walls with the front being higher than the back so that the roof would slope (and rain would fall) towards the back.
Then joining them together and beginning to form a structure for some housing.
The structure very quickly takes its form once some walls are up on the housing.The front side of the housing for the chickens is on a hinge so it can be opened up to make cleaning easier.
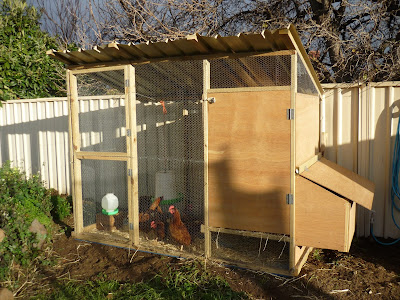
The back section is the important addition where the chickens will lay there eggs. When I first got chickens and had them in a simple aviary it was a real pain to collect the eggs while trying to prevent the chickens escaping every time you went in and out. This way the eggs are collected from the outside of the coop which makes things very easy. In fact my 2 eldest daughters (aged 4 and 6) regularly do the egg collection.
The back panel is also hinged which enables the floor of the housing to slide out when needed for cleaning. I covered the floor panel in some cheap vinyl and cleaning it is very easy by just scraping it with a shovel. When I change over the chickens every two years or so I do a much bigger clean, which is when I take that floor panel out and hose it down.
Also added was a place for the chickens to roost and this is where they sleep at night.
The door was also designed to be split in half for a reason. Any kitchen scraps we have go to the chickens as we don't throw any food in the bin. If the chickens can't eat it (such as meats) then the dog gets it. While we try to minimise wasting food, we take some comfort in knowing that at least it doesn't go in the bin. But I digress.
The reason for the split in the door is to make it easier when giving the chickens food. We can open just the top half and don't run the risk of them escaping into the yard.
When we had the aviary with just a normal door it wasn't uncommon to see me running around the yard chasing a chicken in the morning before work after trying to feed them.
Also if I let them free range around the garden beds for a day I only need open up the bottom half and they can come in and out as they please.
Add a little opening for a door into the chicken's house and we were just about done.
To make cleaning the shed easy I put a piece of fiber cement as a base. Having a standard size of 2.4m x 1.2m was handy here as it was a perfect fit.
Whenever I need to clean it I can just take a shovel and scrape it clean, throw some clean straw down and its good as new. I've since added 3 sleepers underneath the fiber cement to raise it off the dirt and found it keeps the floor drier and lasts longer. Cleaning the shed every few weeks is the hardest part of looking after chickens so if you can make this job as efficient as possible then the rest is easy.
So there you have it - Not your average chicken shed!
I learnt a lot - mostly the hard way - from keeping chickens in that first aviary so a lot of careful consideration went into designing and building this.
I've since painted the marine ply to protect it as it did start to deteriorate after a couple years so if I ever build another one I will paint everything prior to assembly.
However, now there are a lot of cheap options you can buy on ebay which look quite impressive so I might opt for the easy way out next time.
But there is always the satisfaction of building something yourself which you can look back on and be proud of.
Stay tuned for the next entry on chickens where we explore more about looking after them.
If you want any other advice or have any other questions on building your own chicken coop then drop me a comment below.
Not Your Average Joe


No comments:
Post a Comment